Recipe for Homemade Glazed Donuts – Soft, Fluffy & Golden-fried Donuts
The recipe for these delicious, homemade donuts is not only easy to follow, but the end product tastes heavenly. These are incredibly soft and fluffy donuts that require no store-bought ingredients. It begins by preparing yeast dough by mixing flour with warm milk,k after which the yeast gets activated. The process of kneading ensures that the dough is fluffy, and then followed by rising the dough for a while before cutting it out. The next process is proofing again before frying them until they turn golden brown, and finally coating them with vanilla glaze.
Ingredients
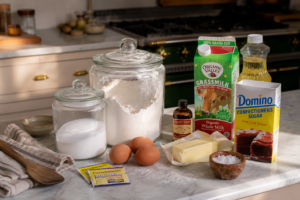
To make these donuts, you’ll need milk, two packets of active dry yeast, granulated sugar, all-purpose flour, salt, butter, two eggs, some vanilla, and, of course, powdered sugar for the glaze. And yes, we’ll be frying these,e so get some oil out too.
Milk and Yeast Activation
First off, we’re gonna measure out one cup or 240 ml of whole milk. We want this to be about 110 to 115 degrees Fahrenheit. I’ll put Celsius down below. This is gonna go into the microwave. I’m at 105 to 110 degrees Fahrenheit. If you get that milk too hot, you’ll kill the yeast, which is not good.
I’m adding in about a teaspoon of granulated sugar, and then give that a stir first. Now I’m adding two packets of active dry yeast. If you’re not using packets, that’s four and a half teaspoons. We’re just gonna give this a mix so it gets all combined, and set it aside for about five to ten minutes until it is nice and frothy.
If this does not froth, start over again because your yeast is dead. Either they got burnt, they’re just too old, or something happened, and the donuts will not work. So always make sure your yeast is nice and frothy. It’s a sign things are gonna be delicious.

Dry Ingredients and Butter
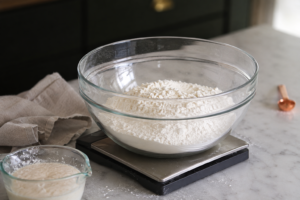
In the meantime, we can measure out the dry ingredients. So get a scale, a big bowl, whatever you want. I actually got two big bowls out because one is for wet, one is for dry, and here’s the deal: you wanna melt six tablespoons of butter out. That’s about 85 grams.
I like to cut my butter into small pieces when I’m melting it in the microwave, because even if you use half power, my gosh, the butter explosions are real. And you can let me know in the comments if you’ve had a butter explosion and how not fun it is to clean up. This gets heated up on half power, for maybe a minute or so.
In the meantime, we’ll get those dry ingredients out. While that warms up, I’m measuring out four and a half cups or 540 grams of all-purpose flour, because it’s easiest with the scale. To that flour, I’m adding half a teaspoon of salt. This will give it a little bit of contrast. We’re gonna mix it up. This gets set aside.
Wet Ingredients
Now we’re onto the wet ingredients. The scale is done. We want that scale back because I have to add my sugar in; that’s 50 grams. Now we’re done with the scale,e and it smells so good. I love the smell of yeast in the morning.
I’m adding two large eggs. We’ll whisk this together now until it’s nice and smooth. Now we’re gonna stir in that yeast, which is like puffed up beyond belief. And if you’re wondering why we used two packets of yeast, by the way, it’s because we want these donuts to be extra fluffy and just have a really beautiful, delicate texture. Whisk those yeasts in.
Mixing the Dough
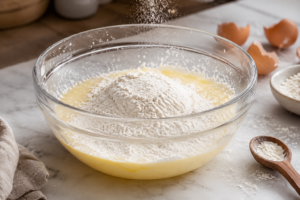
We’re gonna stir the flour in right now and just mix it by hand until a shaggy dough forms. So let’s add that in.
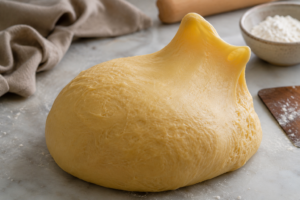
So here you can see, this is a shaggy mixture. Like a lot of nooks and crannies. Definitely not smooth. But what we’re gonna do now is knead this on a lightly floured surface, just until it gets nice and smooth.
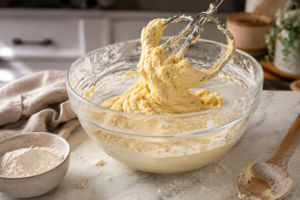
Get this dough out, and yes, it is like a wet mixture. You always know a dough is gonna be delicious when there’s butter and eggs in there, and milk, but also when it’s pretty wet. Cause that means it’s going to be soft and cakey.
Kneading the Dough
I’m gonna be kneading this for about five minutes until it’s tacky but smooth. Tacky means sticky, in case you forgot. It doesn’t mean it has bad taste. This is something you could also do in the machine. So if you’re in a hurry or you just don’t want to do this by hand, use a dough hook and let it knead up.
You’re kneading this until it’s smooth and elastic, but it’s still gonna be tacky or a little bit sticky to the touch. So just keep kneading away, and you can see already this dough looks so much smoother, but it’s not there yet.
Windowpane Test
One of the tests you can do with dough is called the windowpane test. And that just means that you take two little fingers and you stretch them up. This tore immediately. It’s not ready. It should be able to stretch so you can see light coming through, like a windowpane. So we’ve got some more kneading to go.
As you’re kneading the dough, you’re developing the gluten in the flour, which is a protein. And you’re also hydrating the dough, so everything is getting really mixed well together.
My dough is almost ready, nice and smooth, and look at this. I can take two fingers, pull a section out,t and it stretches, and you can see the light comes through. It’s very satisfying. Another test is just to see how it bounces back when you press in. Pressing in, bounces back pretty well.
First Rise
Okay. This is gonna go into an oiled bowl, and yes, there is butter, there is milk, there are eggs in here. This is not pizza dough,gh so it’s gonna need more time to rise in a nice cozy place.
So my dough’s ready. I’m gonna place it into a lightly oiled bowl, just reusing my flour bowl. This wants to hang out in a nice, cozy, warm place for about an hour. You can cover it with plastic or get a bonnet out. In a nice cozy place, in one hour, and we’ll be back with some beautiful, puffed, delicious dough.
Punching Down and Rolling
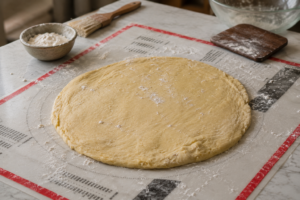
Just a little bit over an hour later, look at this dough. It was actually up to here when I opened it up. Starts deflating right away. That’s okay because we’re gonna punch it down. Punch, punch, punch, punch, punch.
And by the way, when you use a bonnet like this, a reusable one as opposed to plastic, good and bad. Here, it’s a little bit dried out, just a little bit though, which is actually really nice when you dump out your dough. This is just nice because it’s not gonna stick so much to the bottom of your pastry mat or your counter.
Pat it out. It’s a little bit thick right now, so I’m just gonna add a little bit of flour and roll it out. This smells so good, by the way, already.
Cutting the Donuts
For these donuts, we’re gonna use circle cookie cutters. Get a set of circle cookie cutters. They’re my favorite tool in the kitchen, and they are infinitely versatile. They do anything you want.
So we’re gonna cut out our doughnuts and place them onto a sheet of parchment paper, just for transport. Give them a little shape like that. And as you can see, they’re not sticking to the counter because I used that bonnet; really handy.
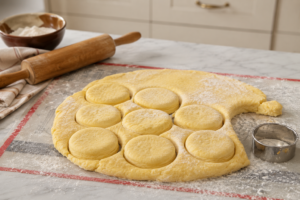
If you want a filled donut, you could fry it up like that. Like, get some jam, get some pastry cream. But I was making classic glazed donuts today, ay so I’m using a one-inch circle cookie cutter just to cut the centers out. And of course, this is a delicious donut hole. Save those. They’re actually my favorite parts.
One thing you wanna be careful of is not rolling your dough out too thin. You do want them to puff up, and these have a second rise. They’re gonna have a little bit more warm and cozy time, and puff up even more. Then we’re gonna deep fry them.
But if they’re too thin or if they’re too thick, they’re just not gonna have the right texture inside because they have to cook through in that hot oil without getting overcooked. It’s a delicate balance. So three-quarters of an inch will do you just right.
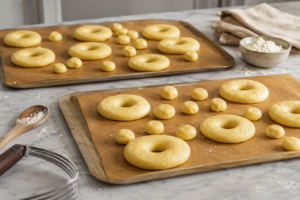
Second Rise
Loosely cover your doughnuts. And we’re gonna transfer these to a warm, cozy place to rise for about 40 minutes. They’re gonna get really puffy, and this stage is important; that’s what gives you that light-as-air texture in your donuts.
Heating the Oil
While our donuts are rising, add two inches of oil to your Dutch oven or a large pot, and place it over medium heat, along with a thermometer. And we’re gonna heat that up until it’s 350 degrees Fahrenheit.
Making the Glaze
In the meantime, let’s make an easy glaze for our glazed donuts. I want three cups, or about 360 grams, of powdered sugar. I don’t need to sieve this out. Six tablespoons, or 90 ml of milk. Pour that right in. This is a much thinner consistency than a lot of the glazes you’re used to.
And now, half a teaspoon of vanilla. You can use other flavorings you love, too. Like maybe a touch of almond extract, some orange blossom water. I think bourbon or rum is a popular addition as well. And yes, you can add citrus zest or juice into this as well. So many delicious choices.
This, as you can see, is a nice thin drizzling consistency. Just what we want. You wanna cover this up just with paper or something, because you do not want your glaze to dry out.
Frying the Donuts
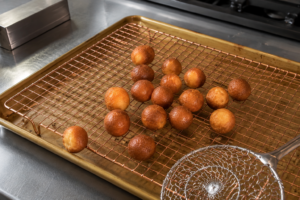
We needed the oil to be 350. My oil’s nice and hot. I’m starting by dropping my donut holes in there. Be careful. You do not want hot splashes of oil anywhere. We’re gonna fry these up until they’re golden brown. It happens really quickly. So keep an eye on them and hopefully have a nice spider to help you move things along and keep them turning over.
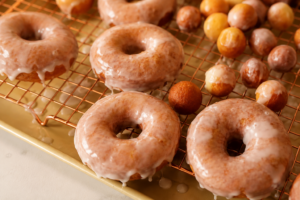
Once your donuts are golden brown, they’re gonna go onto a wire rack over a rimmed baking sheet.
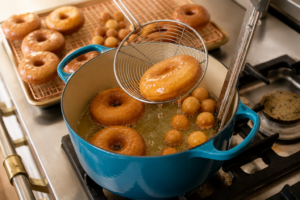
Now it’s time for our proper donuts. So, as you can see, my donuts have really puffed up. We’re gonna place these right over here and set up an assembly line where we just plop them in. And to help with that, be gentle with them right now. You don’t wanna really squeeze them because you’ll push out all that delicate structure inside.
Plop those right in carefully. Let them glide in. You can fry up three to four at a time, but as you add them in, the oil temperature will drop. So keep an eye on your thermometer and adjust your temperature accordingly. Everyone’s stove is different, so you might be on medium low, you might be on medium high. It’s totally dependent on the temperature,e so look at that thermometer when you add things in.
And as you can see, these are getting to be golden brown super quick.
Glazing the Donuts
My bounty of donuts is ready to glaze. So here’s the deal. Set up a station. Uncover that glaze. And you’re just gonna dip your donuts that are still really warm, right in the glaze, as much as you want. Could be atop, it could be fully covered. It’s up to you and what you enjoy. Then we’re just going to dip and let them set on the wire rack.
You can also spoon the glaze over if you want even more coverage. So, plop it like that, spoon it over the top, and this’ll be the completely covered donut. But I will warn you, you’re using a lot of glaze, so make sure you let it drain off for a while first before you pop it onto the wire rack. Otherwise,e you’ll run out of glaze and be sad.

Plop those donut holes in; it’s raining donut holes. And then you’ll just move them around with your spoons to get good coverage, and place them right onto your rack, just like this. Be very gentle though, because these guys are so airy and puffy inside that you don’t wanna collapse them. You really want to preserve that shape.
Soft and airy on the inside. Golden, crisp, glazed deliciousness on the outside.