Hearty Homemade Chili – Thick, Flavorful, and Perfect for Cozy Dinners
Some dinners make you feel cozy as soon as their scent fills the entire house, and homemade chili is one of those meals I cannot help but enjoy every single time. Right when the onions and peppers meet hot olive oil, the kitchen starts smelling irresistibly savory, and everyone comes to ask what I am cooking. This dinner is perfect for those who need something hearty, easy to modify, and absolutely delicious both immediately after cooking and the next day.

I first started cooking this chili several years ago, since I needed a hearty dish to feed everyone without spending hours in the kitchen. Over time, this recipe has become one of my staples, and I particularly love cooking it in cold weather. The first time I tried chili, I did not let it simmer enough, and the taste was watery and quite bland. Now I prefer cooking it slowly and letting the liquid reduce until the chili gets rich and thick, and the difference is noticeable.
Here is how to cook a rich, thick, well-seasoned, and extremely tasty homemade chili.
What You’ll Need
For the Chili
- 2 tbsp olive oil (30 ml)
- 1 large onion, diced (1 ½ cups / 225 g)
- 1 bell pepper, diced (1 cup / 150 g)
- 4–5 garlic cloves, minced (20 g)
- 1 lb lean ground beef, preferably 90/10 (454 g)
Lean ground beef ensures the rich taste of the chili without excess grease floating on top.
For the Seasonings
- 3 tbsp chili powder (24 g)
- 1 tbsp ground cumin (8 g)
- ¼ tsp cayenne pepper (0.5 g)
- 1 ½ tsp dried oregano (1.5 g)
- 1 tsp salt, plus more to taste (6 g)
- ¼ tsp cracked black pepper (1 g)
- 1 tbsp cocoa powder, optional (5 g)
- 1 tbsp brown sugar (12 g)
It might sound strange, but cocoa powder adds amazing depth without making the chili sweet.
For the Base
- 1 tbsp tomato paste (16 g)
- 1 can diced tomatoes, 15 oz (425 g)
- 1 can tomato sauce, 8 oz (225 g)
- 2 cans beans, drained and rinsed, 15 ½ oz each (880 g)
I use pinto and kidney beans in this recipe, but black beans can be just as good.
- 2 cups beef broth (480 ml)
For Serving
- Shredded cheddar cheese
- Sour cream
- Chopped green onions
This chili can be served with rice, cornbread, tortillas, or even over pasta.
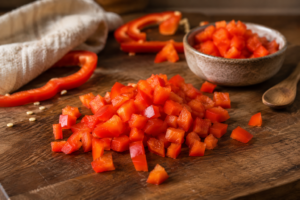
Prep the Vegetables
Dice the onion and bell pepper into equal-sized pieces. The onion should have that distinctive scent of freshly cut raw onion, while the bell pepper should have a fresh garden-like aroma.
Mince the garlic either using a knife or a garlic press. I tend to use 5 cloves, since I prefer chili with an intense garlic taste.
One trick that helps with the preparation is to use a very sharp knife. Previously, I would struggle with cutting onions with a blunt knife, but a well-sharpened knife easily slices through any vegetable and saves time.
Pro Tip: You can prepare the onions, peppers, carrots, and garlic earlier during the day and keep them in the fridge.
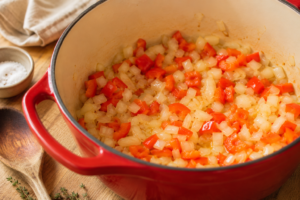
Soften the Onions and Peppers
Heat a large Dutch oven over medium-high heat and add olive oil. Once it starts shimmering, add the onions and peppers.
Let them cook for 5 minutes, stirring occasionally. The onions should become translucent, and the peppers should become slightly soft and still retain their texture. You will hear a gentle sizzling sound, and the scent will become sweet and savory.
In a can, you are using canned beans; now is the right time to drain and rinse them. Doing so will prevent the chili from being too salty.
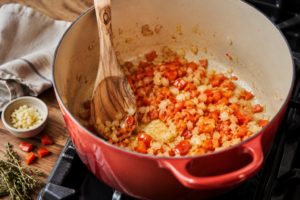
Add the Garlic
Once the onions and peppers are softened, stir in minced garlic.
As soon as the garlic meets hot oil, it releases its distinctive scent instantly. Do not forget to stir constantly to prevent burning.
The first time I made this recipe, I walked away for just a second after adding garlic, and it burnt quickly. Since then, I have been paying attention to the garlic constantly during cooking to avoid ruining the entire meal.
Pro Tip: Garlic burns much faster than onions and peppers. Once it starts releasing its scent, move on.
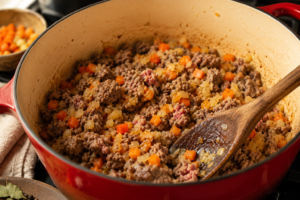
Brown the Beef
Add the ground beef to the pot and break it up into small pieces using a wooden spoon.
Continue browning the beef until it is cooked thoroughly and there is no pink color left. You will hear a loud sizzling noise while the beef releases fat. Also, you will see brown spots appearing at the bottom of the pot – they contain a lot of flavor.
I recommend using lean ground beef, since it allows you to create a rich chili without it being too greasy. In case you use turkey or chicken, make sure it is a bit fatty, or the meat will become dry and hard.
Venison and spicy sausage can also be used as alternatives to beef.
Create a Flavor Base
Reduce the heat and stir in tomato paste.
Tomato paste will darken slightly and release that deep tomato scent after a few minutes of cooking. Its rich and concentrated taste will add depth to your chili.
Then add chili powder, cumin, cayenne pepper, oregano, salt, and black pepper. Stir the mixture well.
Now your chili will become truly flavorful: smoky, earthy, spic,y and warm all at once.
Finally, add the cocoa powder and brown sugar. Cocoa powder adds a subtle richness to the taste, while brown sugar perfectly balances the acids and spices.
Pro Tip: Different chili powder brands have different levels of heat. To determine the heat level, try tasting a pinch of it.
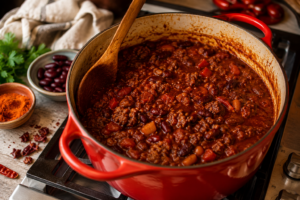
Add the Tomatoes, Beans, and Broth
Stir in diced tomatoes, tomato sauce, rinsed beans, and beef broth.
Use the wooden spoon to stir the bottom of the pot well to scrape off the brown spots that add flavor to the chili.
Right now, your chili will look quite watery, but it will thicken significantly later.
Gently bring the chili to a simmer. Small bubbles should rise to the surface slowly.
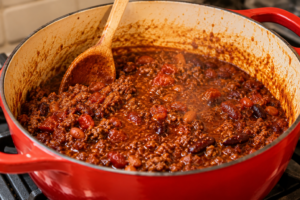
Simmer Until Thick and Rich
Reduce the heat to low and let your chili simmer for about 25-30 minutes uncovered.
During this time, the liquid will evaporate slowly, and the beans and beef will absorb the taste of spices. The chili will become thick and rich, acquiring a reddish-brown color.
Opening the lid during simmering, I always get an irresistible smoky tomato scent combined with garlic and cumin. This combination makes your heart melt.
Once the chili gets thick enough, taste it and adjust the seasoning. I sometimes add a bit more salt or cayenne, depending on the result I want.
Pro Tip: To thin the chili, add beef broth. To make it thicker, let it simmer a bit longer.
Add Toppings and Serve
Serve the hot chili with a generous topping of shredded cheese, sour cream, and chopped green onions.
The cheese will melt right in the chili, while the sour cream will tone down its spiciness. I like eating it with warm cornbread or tortilla chips.
This homemade chili tastes absolutely delicious,s freshly prepared, but it tastes even better the next day.

Mistakes to Avoid
Using a Dull Knife
A dull knife crushes vegetables instead of slicing them. Using a sharp knife will help you prepare them faster and more easily.
Burning the Garlic
Garlic burns very quickly, so stir it constantly until it becomes fragrant.
Not Letting the Chili Simmer Long Enough
If you do not give enough time to the simmering process, the chili will lack depth and thickness.
Skipping the Taste Test
The seasonings of broths, canned tomatoes, and chili powder may differ greatly in terms of saltiness and heat. Never skip tasting.
Not Rinsing the Beans
The liquid in the canned beans can make your chili salty or muddy. Rinsing them will solve the issue.
Ways to Change It Up
Making It Spicier
You can substitute the bell pepper with jalapeño or serrano peppers for added heat. I often use chopped chipotle peppers in adobo sauce for a smoky taste.
Trying Different Beans
Pinto, kidney,y and black beans work well in this recipe. You can use all of them together for a richer flavor.
Adding a Different Protein
Turkey, chicken, venison,n and spicy sausages are all great substitutes for beef. I particularly like the smoky taste of sausages combined with a tomato base.

How to Store and Serve
This homemade chili is perfect for meal prep due to its excellent storage properties.
- Refrigerator: Store in an airtight container for up to 4 days.
- Freezer: Freeze in individual portions for up to 3 months.
- Reheating: Warm in the microwave or on the stove.
To my mind, homemade chili tastes even better the next day. Sometimes I serve the leftovers over rice or baked potatoes for a completely new meal experience.
If you want to serve the most cozy bowl ever, serve your homemade chili hot with shredded cheese, sour cream, and warm cornbread.
This is one of those reliable dishes that never fails. It is quick to cook, hearty, and always delicious.
I hope this recipe will be helpful for you!